There are many reasons why you might want to switch themes: You want a different look, you need a new feature, or you’re just bored of your current theme. It is not that difficult to change a WordPress theme. The process is fairly simple and this article will help you do it the right way.
Changing WordPress Theme Steps:
It’s important to perform a website backup before making any changes to your site. This will allow you to revert back to the original settings if something goes wrong.
After making the backup, the first thing you should do is search for the perfect WordPress theme for your website.
Once you choose the perfect theme, download it to your computer. Now, login to your WordPress dashboard and navigate to Appearance > Themes > Add New Theme
Click on Upload Theme File. Select the file that you downloaded earlier and click Install Now.
Step 2: Preview The New Theme:
One of the best things about WordPress is that you can preview a theme before activating it. This makes it easy to see if the theme is what you want without having to activate it.
You can preview the themes in the WordPress admin area for your website. To preview a theme, click on Live Preview below the installation instruction or by going back into “Appearance” and then “Themes.” You will see a list of all the themes that are currently installed on your site. Hover over your theme and click on the Live Preview.
You will be redirected to a live preview screen with the customizer option so you can make the necessary changes before publishing.
Step 3: Activate The Theme:
When you are finished customizing your theme preview, click the Activate & Publish button. This will publish the preview to your WordPress site and make it active.
And that’s it! Now you learned how to change a WordPress theme.
Wrapping up
The process of changing your WordPress theme is simple and doing it the right way helps ensure that your site functions just as well with your new theme as it did with your old theme.
DoneDone is bug tracking, task management, and customer support all wrapped into one app. DoneDone will help you manage your projects, and stay on top of your tasks without getting overwhelmed by emails. You can also track bugs which makes it the perfect tool for developers who want to keep their clients happy.
1. It Is Highly Visual
DoneDone visual design is so attractive that it makes working on the project more fun. The color scheme allows you to visually see what is being done, what needs to be done, and what has been completed. Essentially DoneDone provides a clear overview of your projects and keeps everyone in the loop. It also helps you to see the progress made on each project and to identify any potential issues early on.
Moreover, DoneDone added the Kanban view feature which is a great way to track tasks, visualize, your team’s progress, and get stuff done. It is highly visual which makes it easy to see what needs to be done at a glance.
2. Easy help desk solutions ( Mailboxes )
DoneDone provides a simple help desk solution. Designed to look like a personal email. The help desk solution can be used in a number of ways, such as:
Creating multiple mailboxes for each shared email address so that employees can work across departments ( Marketing, Sales, Software, web, App, PR and Property Management )
Manage several products and brands from a single account.
Assigning tickets to specific member.
Creating priority for each ticket.
3. Everything In One Place
DoneDone provides a centralized location for all your documents, files, and tasks. With an easy-to-use interface for your marketing teams, development teams, and everyone who wants to keep everything in one place.
It lets everything be connected in one updated place with the ability to move between projects with ease.
Another reason why we chose DoneDone is it lets everyone know what they need to do through notifications and updates in real-time so there’s no confusion about who is doing what and when they’re supposed to be done with their work and it enables users to configure the platforms according to their needs
4. It Supports Multiple Integrations
DoneDone seamlessly integrates with other tools you are already using like like Slack, Google Drive, Pabbly, Zendesk, GitHub, Glip, and Harvest. It syncs data from the tools you use most often so that you always have the latest information at hand.
In PixelDima themes, we added Pabbly connect to create a new DoneDone task every time an issue is added to GitHub.
There are over 800 available apps to connect together in Pabbly.
Note: when you add DoneDone connect you will need your Account ID and Project ID, the image below describes where you can get ids.
5. Helps You Delegate Tasks Effectively and Track Progress Easily
DoneDone allows you to delegate and divide the work into smaller tasks. This will make it easier to track the progress of each task and make sure that everything is on schedule. You can also create a board for each project. Then, you can invite team members to join the board.
The tasks are inserted into the timeline and assigned to each member based on their expertise, each task displayed with a clear and complete set of instructions. This is an efficient way of delegating tasks as there is no need to keep on briefing each team member about the project and task assigned to him or her.
DoneDone sends out an email or notification within the DoneDone.com website app (the Mobile app is coming soon) when your status changes on an issue so you can quickly check the task.
6. Reasonably Priced
Businesses are always looking for ways to save money and be more efficient with their time. DoneDone provides a platform that helps them do just that by providing a service that is both affordable and effective, making it one of the most affordable tools in its category.
Currently, DoneDone.com prices start at $4/MONTH/USER (billed annually). The vendor is offering a 20% discount for all subscriptions that are billed annually. They offer discounts and incentives on their services with a special plan for NGOs, nonprofits, and education institutes.
Prices vary depending on the size of your team and the number of features you want to use. The best part is that you are flexible with pricing because all of the features are available as a monthly subscription.
7. Powerful Reporting and Analytics
To make sure that the project is on track, you need to know where team members are and what they are working on. The best way to do this is through reports and analytics.
DoneDone provides powerful reporting and analytics for teams. It allows you to measure your mailbox or project. The dashboard has charts that show active conversations, average resolution time, first response time, and average response time. You can also filter the report by date or by the project.
Moreover, in the DoneDone roadmap, the founder added a set of reports and features, if you are already using DoneDone you can upvote the one that you want.
Summary:
DoneDone is one of the best All-In-One Project Management And Help Desk Solutions for small businesses, it comping between HelpScoup and Monday.com in a sample way.
The team at DoneDone ( has been working really hard since 2009, yes it’s more than 12 years, under the philosophy “GET IT DONE” you can see and feel it in every small detail starting on the logo, website look, and even the code itself ( check Naming Things by DoneDone )
One thing we like about DoneDone is that it offers a free trial without a credit card. If you are still hesitant or cannot decide for one reason or another, you may sign up for DoneDone.com free trial to get a taste of what it can offer.
The contact form is one of the most important tools for any website. It helps to establish a connection with your visitor, get feedback and sales leads, and to keep in touch with your customers. It is also an important tool for any SEO campaign because it can help you build credibility.
Today, there are many WordPress plugins for form builders available on the market. JetFormBuilder offers one of the easiest ways to create a contact form in WordPress without touching any code at all using the Gutenberg Editor. The plugin creates a custom form that you can easily edit according to your needs.
In this tutorial, we will use the Noor theme and you can see the result on our Contact Page.
Why JetFormBuilder?
JetFormBuilder is a WordPress plugin that can give you all that you need to create any form starting from the contact pages to registration forms, subscription, appointment, and booking. It also has an easy-to-use drag and drop interface which makes it possible for anyone to build their form with no coding skills at all.
Moreover, It comes with pre-built forms and integrations with popular plugins like MailChimp, MailPoet, ConvertKit, and HubSpot which make it easy for you to send your leads directly into your marketing automation platform of choice.
Here are more features with more detail:
19 Form Field Blocks
Using Guttenberg you will get all the fields below:
Select, Radio, Checkboxes, Text, Textarea, Hidden, Calculated, Number, Date, DateTime, Time, Media, WYSIWYG, Range, Heading, Repeater, Group break, Form break, Submit, and Advanced Color Picker.
Smart Features:
Jetformbuilder will let you create smart online forms that react to User choices and personalize the form experience using Conditional Fields which means you can show, hide, enable, disable, or make Fields required/optional.
Calculated Content & Hidden Fields:
With these features, you can build calculator forms that perform basic and complex calculations.
Multi-Step Forms:
Multi-Step gives you the ability to break the form fields into logical steps to make them easy to digest and save the webpage space.
Repeater Form Field
Form Fields
JetFormBuilder PRO Addons:
As I said before JetFormBuilder comes with the free version and the Pro version with 16 Addons.
Install JetFormBuilder:
JetFormBuilder plugin is completely free, and you can easily download and install it on your website. First thing you need to visit the Plugins » Add New page inside your WordPress admin area.
Find the plugin by typing the plugin name, after that, click install and active the plugin.
here is a detailed tutorial that will help you go through the installation process, by the Jetformbuilder team.
How to Create a Form?
1- Add a new form
Go to your WordPress dashboard and go to JetFormBuilder > Add New.
It will open the Gutenberg page editing window. There is a text area to enter that form’s title and three fields: the Hidden field with post ID, text field, and the “Submit” button field will be added by default.
2- Add the Contact form fields
You can add your form from scratch or by adding JetForm patterns I’ll explain how to do this step by step.
– First, remove the default field.
– Click the “Add block” button with a plus-shaped icon in the left upper corner of the window and click patterns in the right upper corner below the search input.
– Select JetForm in the secluded input.
– Choose the form you want to use, for me I added the “Contact Us Form”.
3- Deal with the Form Settings
When you create a form you will have settings for each block and settings for the whole form.
Fields Layout. Here you can choose the position of the label. If you select the Column option, the label will be placed over the field and if you choose the Row option – it will be positioned in the same row with the field;
Required Mark. You can choose the symbol that will be placed near the label if the field is matched as “required”;
Submit Type. In this drop-down menu, you can choose how the page will react to the form submission. Page Reload means that the page will be reloaded when the user hits the “Submit” button, while the AJAX option doesn’t reload the page.
4- Add Captcha Settings
To put a captcha on your form, unfold the Captcha Settings section and enable the Enable reCAPTCHA v3 form verification toggle. Enter Site Key & Secret Key details to continue.
If you don’t have a Site Key and a Secret Key for your domain, make sure you follow the link. Enter your site’s name in the Label field, pick reCAPTCHA v3 in the reCAPTCHA type field, and type your domain name into the Domains text area.
Once you click “submit,” you’ll be redirected to a page with the keys. Copy the keys into the corresponding fields of Captcha Settings.
5- Set Post Submit Actions ( Send Email )
When the user hits the “Submit” button, this action sends an email to some address you choose in the settings. To do the customization, click the “Edit Action” button with a pencil-shaped icon on it. This will open a settings window.
6- Go through the general messages settings
The last section allows you to set the messages that the user will see in different situations. You can type in any message that you think will be understandable to the user.
Conclusion
I hope you have enjoyed this tutorial and learned how to create a non-spam form using the JetFormBuilder plugin and Gutenberg Editor. In conclusion, JetFormBuilder is a great way to create your contact forms, surveys, or bookings. They can be used in any niche and for any purpose.
The WordPress Theme and Plugin detector is a tool for WordPress users which detects installed plugins and themes that are being used by a website. It is extremely useful for developers who are looking to learn how other themes and plugins work and for those who want to find out more about the websites they visit.
There is a number of WordPress theme detector extension available out there, but most of them are not perfect for detecting WordPress themes. That’s why we have shortlisted the best ones which work perfectly for most websites. Let’s dive in!
This is a chrome extension that you can use to discover the theme and plugins used in a website. You just need to install the extension and visit any web page that you want to know if it was built with WordPress, if the website is based on WordPress the extension will be on blue and when you click on the extension icon it will provide the theme and the plugins that used to build the visited website.
This Chrome extension detects which WordPress theme the visited WordPress website is currently using and provides a link where you can find the WordPress theme.
For example, on this website, you are using the theme “Noor“.
This extension automatically detects that and shows you the link to download it from ThemeForest.
The Chrome extension, Scan WP, allows you to know how it was built, What theme and plugins they use on any WordPress page that you visit with a single click. The extension adds an orange WordPress logo to your browser when you install it and is very easy to use.
After installing the Chrome extension, navigate to any webpage that was built with WordPress and click on the orange logo in your browser. Within a few seconds, the extension will provide you with everything there is to know about the theme and plugins used in the website.
These extensions will help you identify if a site is using WordPress in no time. And then provides you with an extensive report about which theme or plugin the WordPress website is using.
WordPress is the most popular content management system (CMS) and it powers 34% of all the websites on the internet (about 64 million WordPress websites) and it has a 60.8% market share in the CMS market. The best part about WordPress is that it’s easy to use, and it has all the tools to make different types of websites. Thanks to the new major updates, web design on WordPress has never been easier.
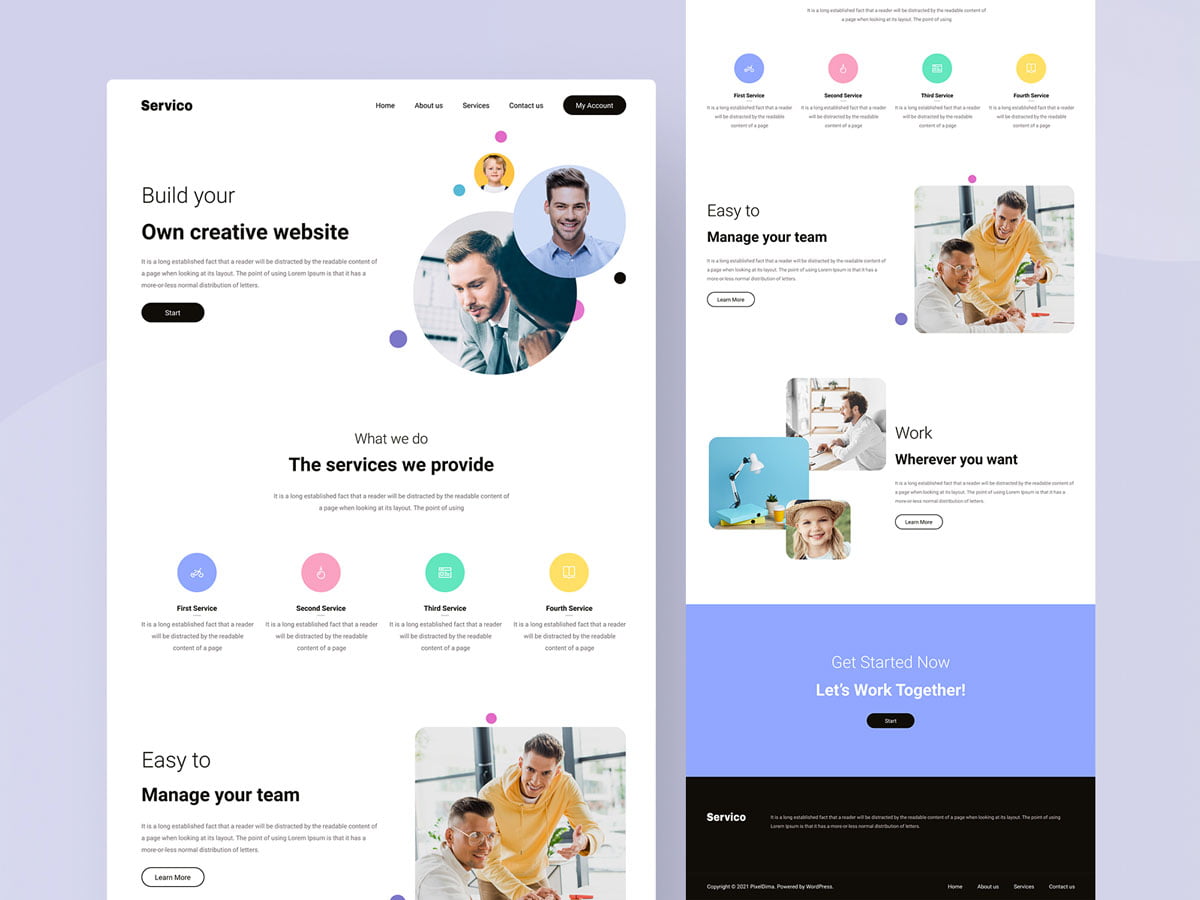
In this tutorial you will learn how easy to make a website using the Minimalist WordPress Theme Noor, we will start with WordPress child theme installation, activate the required plugins, and then implement the design and publish our work.
Let’s start our WordPress website design project!
Theme Installation
First, you need to get the WordPress theme that you want to use to build your website, in this tutorial I will use Noor WordPress Theme and you can Get it from ThemeForest Once you download the theme’s zip file to your computer go ahead and log in to your site admin page. Once there, go to Appearance > Themes.
Then click Add New button, in the next screen you will see a list of themes with the ability to search for the available themes in the WordPress directory. In our case, we will use our downloaded theme. To do that click the Upload Theme button and then upload the theme and click Install Now button.
After the install is successfully finished click Activate.
Then you will be redirected to the theme Wizard installation, in this step, you will be asked to activate the theme, name the child theme, install the plugins and choose a pre-made template to install, in our case we won’t install the demo and we will just use the theme. And we are done with the WordPress theme installation.
Implementing the design:
We will use the attached pre-made design (Figma Template). It’s free for download and you can use it for your own website.
Before start making the website first we need to add the style to the customizer so whenever we create an element the style will be applied to it.
In the WordPress admin panel navigate to Appearance > Customize thenin the customizer select Site Layout and Design > Site Style and apply:
Primary Color: #100D07
Secondary Color: #100D07
Then from Customize > Typography apply the same font style from the design file to:
Body: Font Size:16px, Font Color:#6F6868
Main Menu: Font Size:18px, Font Color:#100D07
H1,…H6: Heading Color:#100D07
Button: Font Size: 18px
Footer: Widget text color: #D2C5C5
*Font Family used in all parametersis Roboto
As we finished applying the style now, let’s start building the website!
Creating the header:
The header contains the logo, the navigation menu, and the first introduction section. First, we need to add the logo to do that navigate to the customizer select Header > Logo & Site Identity and upload your logo on Upload Your Default Logo the preview will be shown directly on the right side of the customizer if you are happy with the display result, click the publish button.
Now we need to create the different pages so we can add them to the navigation menu.
To do this, in the WordPress admin panel navigate to pages and click add new name the pages and do the same for the rest of the pages.
Now we need to create the navigation menu, in WordPress Admin Panel navigate to Appearance > Menus, name your menu (I’ve named it Main Menu but you can choose the name you want) then click create.
To add the pages in the menu that we created we need to choose them from Add Menu Items > Pages (View All). Select the pages that you want to add and click Add to Menu Button.
In our template, we have the last menu item “My Account” styled as a button. So to make it looks the same we need to open the Menu Item Parameters to do that click the arrow at the right of the menu item, in the Menu First Level Style select Button Small and add the class“dima-btn-pill”in the Text Classes field to apply the pill effect.
Now let’s make this menu our primary menu and assign it, to do that check the primary menu checkbox in the Menu Settings below the items.
Now let’s add our homepage contents and start with the first section. Navigate to Pages > Home and click Edit With WPBakery Page Builder
You will be redirected to the front-end editor where you can add the contents easily. Click Add Element button then add the Section Row element and divide the section row into two columns as shown in the animated GIF below.
Now in the left column, we will add headings, text, and button elements.
To do that click on the orange plus button each time you need to add a new element and add the content and the style of each one and click save in the element settings to see the effect.
In the right column let’s add the image, to do that click the plus button and choose the image element, and hit save. And we are done with the first section on our website, click the update button in the top bar, and let’s jump to the next section.
In the second section, we have a title and small description, and four icon-box elements each icon-box represent a service.
First, we add the title of the section and make it at the center of the section.
Now let’s create a section row and divide it into four columns and add an icon-box for each column. The icon-box contain two sub-elements the first one is icon-box header contain the icon and icon style (Noor WordPress theme provide a list of SVG icons that you can use in your website and you can check the list here) and the second sub-element is the icon-box content and it contains the title and text of the icon-box.
The third and the fourth section are like the first section that we built together and I used the same steps. The only difference is in the Button style so in the Button Settings > Style > Button Style select the outline style.
Now let’s jump to the last section.
The last section contains a background color and simple text heading with a button
First, we will create a section row and add a background color to it then add the text and the button inside the section row as we did in the previous sections.*
Now the last part of the website, let’s create our footer.
The big footer contains the logo and description and the small footer contains the copyright info and navigation menu.
First, let’s add the widget to the footer via WordPress Admin Panel > Appearance > Widgets and add the contents in the First Widget Area #1 then hit update(In this time we will use Gutenberg Widget Editor as shown in the GIF)
Now in Customize > Footer > Widgets: Footer Widget Area choose the one column style.
For the small Footer just assign the menu that we created to Footer Menu via WordPress Admin Panel > Menus > Menu Settings and check Footer Menu
We hope you enjoyed our tutorial about making a website using WordPress. WordPress is a powerful tool that can help with most website needs and can provide a lot of freedom to create and customize your website.
If you’re interested in getting started with using WordPress for your own blog, we’d love to help. We offer a free consultation for beginners that helps you pick out a theme and customize it to fit your needs. We offer this consultation before you commit to buying any theme, so there’s no risk in trying this! You can contact us anytime with any questions!.
What are you waiting for? Get started on making your website today.
In order to understand our customer’s needs from the search they do, we enabled ‘Site search Tracking’ in Google Analytics to see what people are searching on our Documentation Website.
The default search engine you’ll get from WordPress is decent and simple by a specific order.
Search results by WordPress are not exactly great. Unlike Google, the WordPress search omits the emphasis on the keyword if it found matches.
How to Active Site Search Tracking
Site Search Tracking
Step 1:Open Your Settings in Google Analytics: The first thing you need to do is to sign in to Google Analytics account and choose the site in which you’d like to enable search tracking. Click the Admin option. Then, click View Settings.
Step 2: Enable Site Search Tracking.
Step 3: Set your “Query parameter”: The “query parameter” is the letter that appears in your site’s URL before the search terms. For most WordPress sites, the query parameter is the letter “s.”
Now you can see how the visitors search your site. In Google Analytics, you can go to Behavior » Site Search » Overview to view your site search data.
What is Algolia?
Algolia is a “Search as a service”. It gets your data from your website ( Pages, Posts, Products or custom posts ), in a proper format ( do not worry we are going to use a plugin for that ) and Algolia provides you a search functionality with your data on your Website/App.
Why Algolia in WordPress?
Offload WordPress search – Every time you search for a keyword in default WordPress, the keyword is searched in the MySQL table which is a resource-intensive task, especially if there are a lot of posts.
Faster search results (extremely fast) – Algolia can get results in <5ms!
Better user experience – Auto suggestions, typo tolerant, instant results, highlight keyword and much more.
Language-agnostic – This means that, out of the box, Algolia supports all languages and alphabets, including symbol-based languages such as Chinese, Japanese, and Korean.
The free plan is for non-commercial use but it’s more a legal term than anything. You can use the free plan as long as you display the Algolia logo in the search results page
How to Implement Algolia Search in WordPress
1 – Get Algolia API keys
Sign up for Algolia and get the API keys (an app will be automatically created).
By default, it will be set to “Do not use Algolia”. Choose “Use Algolia in the backend” or “Use Algolia with Instantsearch.js”.
4 – Active Autocomplete
Active Autocomplete
Here’s an example shows how the Autocomplete Work with our theme Noor
Noor with Algolia on backend
4 – Adding Algolia Logo On your Search result page
If you are like us using Algolia for free you must display the Algolia logo in the search results page, In order to do that with Noor Child theme all you need to do add this PHP function into function.php and don’t forget to change the “src” image URL
Conclusion
Adding Algolia gives you better user experience and faster results.
If you liked this article, then please subscribe to our Newsletter for WordPress tutorials.
A Progressive web app is a website that looks and feels like an app on your mobile device and can be installed on smartphones, tablets, and desktop. What this means is that the users can access all information and capabilities without downloading and installing the mobile app.
Progressive Web App Minimal Requirements
Here is a set of minimum standards by google, or a baseline for Making a PWA. And there is a Lighthouse tool to verify and validate compliance. The checklist:
The site is served over HTTPS (SSL) and avoids mixed content.
Web Manifest: (The web manifest is a simple JSON file the browser loads in the background ).
Service Worker with Offline Caching
Why PWA on an e-commerce website?
Your store becomes Installable: Allow customers to browse your shop with a full-screen immersive app. Customers can open your PWA from a home-screen app icon instantly.
Improved UX to Improve SEO: Well crafted PWA means you deliver a better user experience, which helps you win at SEO. The goal is to deliver a great user experience that rivals native applications. Its the better user experience that factors into your ability to rank better in search engines.
Discoverability: 93% of online activity starts with a search engine, not an app or an app store. This is one of the many reasons we made search engine optimization WordPress Themes for our clients.
AMP (Accelerated Mobile Pages) integration – PWA works perfectly with AMP, this is why we made main AMP ready theme Noor support AMP, PWA, and WooCommerce.
Using PWA on WordPress
Installation
If you are using Noor theme, all you need to do it go to Noor > Install Plugins > Install PWA as showing on the image below. Or you can install it with the traditional method after you download it from WordPress Plugin.
Install PWA
Configuration
Once the plugin has been installed and activated, you can enable PWA and set your options. To do this, head over to Appearance > Customize > Advanced Settings > Performance Options. At the bottom, you will see the Progressive Web App options, and the Enable Progressive Web App option is the first option. By default, this option is turned off. Select On, and save your theme options to enable the Progressive Web App.
If you want to know more about those options on details please follow our documentation.
This is how Noor Theme will look like at the user’s end:
Add Noor to Home screenStart the APP
And here how a user can buy and add to cart goods using the APP we generate from our website itself.
Add To cart
Progressive Web Apps is good for a blog website and magazine too:
In PixelDima our aim is to follow the star-of-the-art by following the new technology, If big-name like Alibaba and Aliexpress using AMP and PWA, I imagine you can see how they can fit into your overall business strategy.
Wrapping it Up
If you’ve read this far, you’re probably now on-board with this technology being a game-changer. The good news is that WordPress and Google working together to bring Progressive Web Apps (PWA) to Core.
Today I’ll show you how to start a Local WordPress Development on your machine for free, In the end, we will be appel to test any theme or plugin or start your website locally and with one click you can make it online.
For a zillion years, I used XAMPP after that I moved to MAMP PRO before I switched all my local WordPress development over to Local by Flywheel. it’s really good It does everything you want it to.
What’s Local by Flywheel
In brief, it’s A development tool for WordPress sites, it let you create a local WordPress website.
Some of Local by Flywheel’s key features include:
Running Multiple WordPress Installs: Local by Flywheel spins up a local site for you with all the dependencies that WordPress needs
Live Link: making it possible to show your site to select people
How to get started with Local by Flywheel (in 2 Steps)
Step 1: Install Local by Flywheel
To download Local by Flywheel, visit the website and select the Free Download button. Next, choose your platform, and enter some basic information (only the email field is mandatory):
Your download should start right away. Give it a few moments, and then run the installer file. You’ll then be taken to a start-up screen, where you simply need to select the Let’s Go! button:
This will install a few programs that are required for Local by Flywheel to work properly. The installation may take a few minutes to complete. If you receive any prompts during the process, make sure to hit Yes to permit the installer to do its job.
After, you’ll be taken straight to your new Local by Flywheel dashboard:
Step 2: Create your local WordPress site
Next up, let’s create a brand-new local WordPress website. To do so, select Create a New Site in your Local by Flywheel dashboard or just click the + button on the left-hand bottom corner. This will take you to a simple setup wizard, where the first step is to create a name for your site.
You may want to make this something descriptive, especially if you plan to create multiple local sites. You can always change the name of your site later on.
In addition, you can expand the Advanced Options tab to configure a few optional settings if you’d like:
Here you can set a domain and path for your local site, and choose whether to create it using a Blueprint. This last option is a handy time-saving Flywheel feature that lets you set up a site using a predetermined set of themes and plugins.
Once you’ve entered a name for your site, you can continue to the next screen, here, you have two options.
You can choose Preferred to set up your local site using a recommended set of tools, or select Custom to configure your environment:
The Preferred option works well for most beginner users, while Custom comes in handy for developers with more specific requirements.
Either way, continue to the last step once you’re done here:
On this screen, you’ll create a WordPress username, a secure password, and an admin email address. Under Advanced Options, you can also specify if you’d like this installation to be a multisite setup. Then, hit the Add Site button.
After a few moments, you’ll see your new site listed in the dashboard, along with all of its information:
You can now select the Admin button to log into your site and get to work! In addition, you can always come back to this dashboard if you want to make changes to your local site’s setup or domain.
Installing Noor theme demo for testing
A lot of our clients on PixelDima asking us for pages from another demo they install, this video will show you how to install any demo you want locally so you can copy and paste any page you want.
Conclusion
Creating WordPress site never been easier with Local by Flywheel all you’ll need to do is install it and create your local WordPress site and export the site any time to your flywheel when it’s ready to go.
If you have any questions about Local by Flywheel or you want to try the pro version you can talk to Local by Flywheel chat and ask for Shelbi Kyler before signing up it will help you to choose what best for you.
⚠️ HTTPS is no longer optional, Starting from February 2020, Google Chrome browser will block all mixed content on web pages by default.
In this tutorial, we will show you how to quickly fix WordPress mixed content warnings.
HTTPS benefits
When a browser requests resources over HTTPS—which stands for HTTP Secure—it uses an encrypted connection to communicate with the webserver.
Authentication: HTTPS lets the browser check that it has opened the correct website and hasn’t been redirected to a malicious site.
Data integrity: HTTPS lets the browser detect if an attacker has changed any data the browser receives.
Secrecy: HTTPS prevents an attacker from eavesdropping on the browser’s requests, tracking the websites visited, or stealing information sent or received.
SEO: HTTPS builds trust, is an SEO ranking factor, and provides more accurate referral data.
What is Mixed Content Warning?
Mixed content occurs when initial HTML is loaded over a secure HTTPS connection, but other resources (such as images, videos, stylesheets, scripts) are loaded over an insecure HTTP connection. This is called mixed content because both HTTP and HTTPS content are being loaded to display the same page, and the initial request was secure over HTTPS. Modern browsers display warnings about this type of content to indicate to the user that this page contains insecure resources.
WebFundamentals
How to find the non-HTTPS contents
There is a free little tool called SSL Check from JitBit which you can use to crawl your HTTPS WordPress site and search for insecure images and scripts that will trigger a warning message in browsers. The number of pages crawled is limited to 200 per website.
How to find the non-HTTPS contents using SSL Check
How to Fix Mixed Content Warnings
Ther are several strategies to fix the HTTPS mixed content warning on a WordPress site, manually or using tools and plugins, in this tutorial we will use the best and efficient way to fix the mixed content warning.
We are going to Edit the site database with the easer and secure way using easy-to-use plugin Better Search Replace to find and replace http://example.com with https://example.com in a few minutes, and then simply delete the plugin after you’re done.
HTTP to HTTPS search and replace
Enter in the search for the field the value you want to search for in the database, which in this case is our HTTP domain: http://example.ink.
Enter in the replace with the field the new value that should be used to replace the value that you are searching for. In this case, it is our HTTPS domain: https://example.ink.
Select tables you want to search on, for multiple tables select click Ctrl-Click for Windows or Cmd-Click for Mac, In this case, we select all tables.
Ensure the “Run as dry run?” option is selected first, as this will count how many replacements will be made without actually making the replacements.
Uncheck “Run as dry run?” and click ‘Run Search’
Important: Ensure you don’t include any leading/trailing whitespace in either of the fields as this might produce undesirable results.
We hope you will find this tutorial helpful while fixing HTTPS mixed content. Thanks for being with PixelDima!